“[Swatches are] as honest as ex-husbands with new girlfriends and hair transplants who owe you child support…. on a good day.”
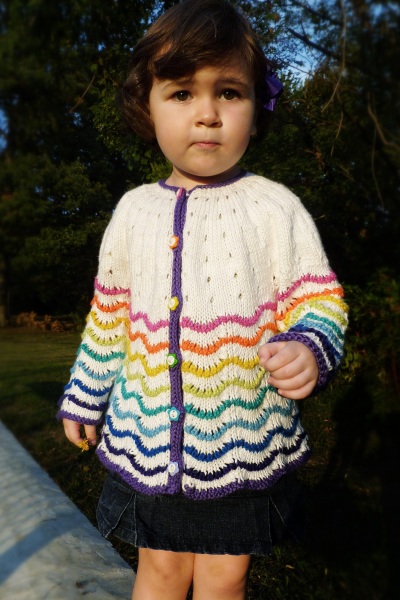
FO Friday: Scalloped Lace Toddler Cardigan
Pattern:
My own
Yarn:
KnitPicks Shine Worsted in White, Cosmopolitan, Grapefruit, Dandelion, Citrine, Reef, Sky, French Blue, Pageant, and Iris
Notions:
The buttons are, again, from TessaAnn on Etsy. Aren’t they perfect??
Notes:
I love(1000) this sweater. It might be my most favorite project ever. And the munchkin informed that she “yuvs” it, too, which is high praise indeed.
It’s a little bit big on her right now, but hopefully that means she’ll get a bit of wear out of it. The round yoke is quite roomy and the sleeves could be worn as 3/4 length on a larger child.
Time to complete:
Just under three months, which is pretty good considering that I forgot the yarn on vacation and then lost the last skein of white yarn and had to order more.
Gnashing of teeth
You know the Scalloped Lace Toddler Cardigan? The one I ran out of yarn for and had to order more and waited and waited and waited for and finally received and bound off all of about 48 hours ago (pictures to follow)? That sweater??
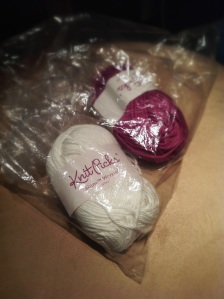
Well. Look what I just found while digging around in my yarn stash? Yes. That would be the skein of yarn that I thought I had but then couldn’t find and thought I’d used up. But it was actually sitting there, plain as day, in a bag with another color that I ended up not using in the sweater.
Grrrrrrrr.
Knitmare on my street
In addition to being cruel, knitting just loves to yank my chain. Just when I’m feeling smug about some technique that I’ve mastered, along comes a project eager to smack that confidence right out of me!
While I was waiting for the yarn for the Scalloped Lace Toddler Sweater, I decided to cast on for the second sweater I had planned to knit the munchkin this fall. Several years ago, I had stumbled across A Cardigan for Merry, which was a baby-size adaptation of A Cardigan for Arwen from the Winter 2006 issue of Interweave Knits. I loved the clever reversible cable, and decided to use it as the inspiration for a sweater for my daughter. I had some Knit Picks Andean Silk yarn (an alpaca, silk, and merino blend) that I’d picked up when it was discontinued a few years ago which seemed as though it would make a scrumptious and warm sweater. It was a worsted weight, though, which meant that the cables from the original pattern would be too large for a child-size sweater. Serious swatching ensued, while I tried to determine the best-sized cable and settle on a fabric that would be dense and warm but not stiff (or unpleasant to knit).
I decided that I would put a small cable at the bottom of each sleeve. Since the cables are reversible, the cuffs could be worn folded up now and then unfolded later, so the sweater could hopefully see more seasons of wear. (I had used this same approach on a Baby Surprise Jacket for my daughter which she’d only recently outgrown after nearly two years of use.) To make the cuff completely reversible, I decided to graft the cable pattern. It was top-to-bottom grafting, so there wouldn’t be any half-stitch jog to complicate matters. And after all, I told myself, I am old pro at Kitchener stitch. Grafting in pattern wouldn’t be that hard.
Oh, such hubris! My first attempt wasn’t horrible, but I discovered that I needed to rethink how I’d planned to pick up stitches along the side of the cuf for the sleeve. So I knit a second cuff. That time, I used a different provisional cast on, keeping the loops live around a spare circular needles. I read a couple of articles about how to graft in pattern. I was ready! Well, that approach ended in abject failure (not to mention some rather unladylike language!). I tried again. Same result. (Well, maybe worse language, which I followed up with a beer and a good night’s sleep). The next morning, fortified with coffee, I decided to use the K.I.S.S. method: I cast on with waste yarn and knit four rows. I switched to the working yarn, knit the cuff again, and switched back to waste yarn for several rows at the end. Then all I had to do was follow the path of the waste yarn. Finally: Success! Picking out the waste yarn was a pain, but better than ripping out my hair!
What do you think? The grafted seam is just above the end of the yarn on the left side.
So tell me… what techniques give you fits?
In praise of i-cord
I’ve been told that the “I” in i-cord stands for “idiot,” which I find to be quite unfortunate, because it is one of my favorite knitting techniques. By itself, it makes lovely ties and is a fun way to finish off the top of a hat. Applied i-cord gives you even more options and is one of my favorite ways of finishing off a raw edge.
For the Scalloped Lace Toddler Cardigan, I decided to work the button bands with applied i-cord in a contrasting color. I picked up and knit on the right side with the purple yarn, purled back, and on the next row worked 3-stitch i-cord. When I came to a buttonhole, I worked the bottom half of the buttonhole like TECHknitter’s Tulips buttonhole, and for the top I simply worked three rounds of plain (unattached) i-cord. It worked like a charm.
I liked the way the contrasting trim looked so much, I decided to do the same thing around the neckline. Except that I didn’t want to work any extra rows. I picked up stitches around the cast-on edge of the neck with a sock-sized circular needle. I tried to work i-cord directly on those stitches, but the white yarn underneath showed through. I knew there had to be another trick, so I hunted around online (Thank you, Google!) and found this technique at The Purl Bee. Brilliant!
I even figured out how to weave in the ends so that the I cord appears to travel seamlessly around the neckline. So all this time spent waiting for my yarn order so I can finish the sweater wasn’t totally wasted.
To keep myself from stalking the KnitPicks site to see if my order shipped, I’m working on weaving in the hundreds of ends. I think I’ve tackled about five hundred, with about three hundred left to go…
The next sweater I knit is going to be a solid color, with a yarn I can split-splice, so I only have two ends to weave in when I’m done!!
Knitting, thou art a cruel mistress
My husband and son went camping this weekend, so I figured my daughter and I would have a lazy, relaxing weekend (which implies that lots of knitting would happen while the munchkin was napping or after she went to bed for the night). But alas, the munchkin had other plans. She decided that Friday night was a great time to learn how to climb out of her crib, so the weekend (and most nights since then) ended up being an exercise in munchkin retrieval and sleep deprivation. (I think it was 11:30pm or so on Saturday before exhaustion won out and she finally crashed, too tired to make one more foray.)
I had big knitting plans for the weekend. The Scalloped Lace Toddler Cardigan has been languishing in my knitting basket since we got home from vacation and it was reunited with the missing skein of pink yarn. It needed two sleeves (and eleventy-billion ends woven in), so really, it was practically done, right?
Wrong. I knit away at the first sleeve, ripping back several times as I debated the best way to reduce one pattern repeat on the underside of the arm. I had this season’s Wallander on the DVR to keep me company (I ♥ PBS!), so I was having a merry old time. I bound off and went to start the second sleeve (which, I reasoned, would take me much less time, since I didn’t have to tweak the design this time. I was more than halfway through the skein of white yarn, but hey, it wasn’t a very big sleeve as toddlers don’t exactly have huge arms, and I had another skein of yarn in my stash. About halfway through I looked down and realized that I only had a few yards left. I went upstairs and… (You know what’s going to happen here, don’t you? The ominous music is swelling in the background, like a horror movie in which the heroine has to go check out the mysterious thump in the basement, despite the fact that she’s only wearing underwear and several of her friends have just met grisly ends.)
Yes. I was out of yarn. With only a little over two inches of a small sleeve to go. Gah! So I sulked. And knit on a sock for a while. But finally I accepted there was no way around it; I was just going to have to order more yarn. This particular yarn (Shine Worsted) came from KnitPicks. It’s about $3 a skein. So I went to the KP website… and promptly spent $50. On the plus side, I got several books from their 40% off sale, and free shipping. On the minus side… I spent $50 to get a $3 skein of yarn. My husband would not find that to be such a great deal. So I also bought three skeins of Felici Sport to make a pair of socks for his gargantuan feet. I’m sure he’ll understand.
But the darn sweater is still sitting there, mocking me. It was chilly yesterday morning, and the munchkin informed me that she was cold. A sweater would have been perfect. Sigh.
Knitting, sometimes thou art a cruel mistress….
Friday Funnies: On Swatching
Sock it to me
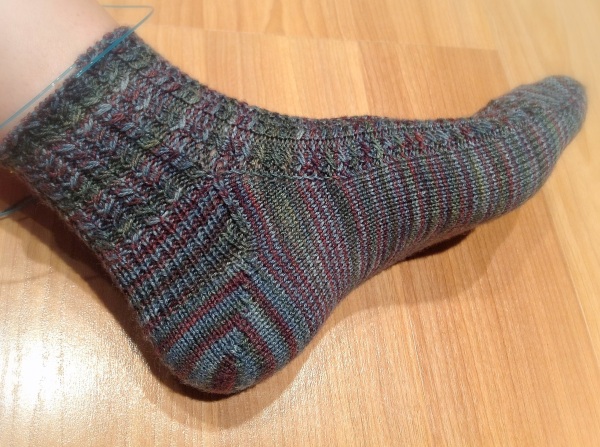
I finished the second Solemate sock last night. I love it. The shadow-wrap heel fits better than the German short-row heel, feels smoother inside, and looks nicer. I like the way I reduced the gusset stitches on the second sock better, too. (I worked it flat, like a heel flap, rather than reducing the stitches in the round, which made the first sock a bit baggy around the front of my ankle.)
Both socks are about the same size, but the second sock used 4g less yarn than the first. I’m not sure how much of that was the heel structure and how much of that was gauge. I worked the the first sock using DPNs from and the second using circulars from a different manufacturer. I worked the back of both socks above the heel turn using needles one size smaller, but I switched back to the larger needles sooner on the first sock.
The only piece of the puzzle that I’m not totally happy with is the bind-off at the top of the sock. I worked the k1, *p1, slip both stitches back to the left needle and p2tog, k1, slip both stitches back to the left needle and k2tog, repeat from * bind off. (I’m not sure what it’s called exactly.) It’s super-stretchy, which is great, but it flares out a lot, which is not so great. I didn’t weave in the ends yet; I think I might pull it out and work a tubular bind-off instead.
In the meantime…. Right after I snapped this picture, I ripped the first sock back to the heel. I’ll ponder the bind-off while I redo the heel and leg. I’m open to suggestions!
Friday Funnies: Packing the necessities
I found this particularly funny given my packing failure for our vacation this year…
I think I need this one on a yarn-stuffed tote bag!
Heel-tastic!
My first pair of socks was a pair of top-down, traditional heel-flap socks. They fit my too-long, too-narrow, too-high-arched feet perfectly and hooked me on sock knitting. Then I discovered toe-up sock knitting, and was torn.
There were a lot of pros for toe-up socks:
- Running out of yarn 1/4″ from the end of your sock is a lot easier to deal with if you’re working toe-up
- Judy’s Magic Cast-On is An Amazing Thing of Beauty (and is way more fun than Kitchener stitch)
- Short row heels look more like “store-bought socks” (and tend to be better-received by non-knitters)
- Easy to check sock fit and make adjustments as you go along
But there were a few cons, and they were pretty significant:
- Short row heels don’t tend to fit people with high arches as well
- My attempts at traditional, wrap-and-turn short row heels were pretty darn ugly, full of holes and stretched-out stitches
So I played with a few variations. My Serpentine socks used a gusset heel that fit my instep well, but were a bit too big around my ankle. The short row heels in my Everyone Outta the Pool socks fit well but still weren’t that pretty, and they were a bit harder to keep track of/adapt to other patterns. The German short row heel I used in the first Solemate sock was easy to execute and looked okay, but was a little bit lumpy inside and required a plain round in the middle of the heel that messes up self-striping yarn patterns (and would also make it difficult to add a contrast-color heel).
But once again, Ravelry came to my rescue. Another Raveler mentioned being pleased with a “shadow wrap heel” in one of the Rav forums the other day. Of course, I had to look that up immediately. And then I had to try it out on the second Solemate sock, which had patiently been waiting for me to get around to turning the heel.
To accommodate my high instep, I combined the shadow wrap technique with a gusset: First I increased 1/3 of the heel stitches on either side, then I worked the shadow wrap short row heel (over the original number of stitches only), and finally I worked a 1×1 rib heel flap, consuming the gusset stitches until I was back to my original heel count (well, in this case, until I was down to my new heel count, as I needed a few extra stitches to continue my cable pattern seamlessly around the sock).
Success! The heel fits beautifully and comfortably over my arch, and the ribbing (which I worked on needles one size smaller) hugs the back of my heel and adds a little bit of padding like a top-down heel flap does. The short rows are easy to execute and keep track of, and the finished seam is pretty and gap-free. I think I’ve found my go-to short row heel!
Now the burning question is… should I leave the first sock alone, or should I rip it back and redo the heel using this technique? I’ve already decided I want to rip the ribbing at the top and redo it. But how far should I rip? If I redo the heel, I can also try a few things to round out the shape of my short-row heel a bit, to accommodate my super narrow heel even better. Hmmmmm…
What’s your favorite sock knitting method? Top-down? Toe-up? Heel flap or short-row? Wrap-and-turn or something else? Gusset or not? Have some other fabulous technique I haven’t heard of yet? Please let me know in the comments!


